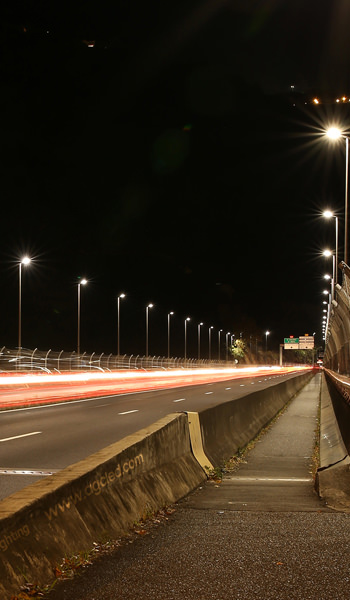
The utilization of tunnels relieves the pressure of crowded road traffic and shortens the distance from one place to another, providing a faster and more convenient transportation way. Within tunnels, which are darker and narrower than open roads, reliable and high-performance lighting is vital for safe traffic.
The enclosed environment inside the tunnel may cause discomfort, anxiety, and fear. Drivers are not likely to slow down as they are pressing to pass through the tunnel as fast as possible. Moreover, the brightness contrast between the outside and inside of the tunnel impedes the driver's vision. The combination of desperation to escape the tunnel and blurry vision increases the risk of accidents.
To ensure visual adaptation and safety, tunnel lighting is divided into 5 zones with different lighting levels. The zoned tunnel lighting reduces the brightness contrast and increases the visibility of drivers. However, the structures and sizes of tunnels vary from each other. Improper installation may result in severe glare and uneven light distribution. Thus, installations of tunnel lights should match the tunnel.
Aims of tunnel lighting
There are two aims of tunnel lighting. One is to keep the safety of traffic entering, transiting, and exiting the tunnel. The other is to ensure smooth traffic flow in the enclosed section of the tunnel.
To achieve the aims, tunnel lighting should be adequate, comfortable, and of high quality.
Adequate lighting increases the visibility of drivers, offering excellent visual guidance. It also allows drivers to identify road signs and possible obstacles quickly, reducing accidents.
Comfortable tunnel lighting is supposed to be flicker-free and low-glare. This requires appropriate lighting levels that are adapted to different zones of the tunnel and proper installations.
Good color rendering is the key point of high-quality tunnel lighting. Lighting with higher CRI enhances the actual appearance and details of the interior tunnel environment.
Qualified tunnel lighting makes traffic safe and provides a comfortable visual experience like driving on an open road.
Why zone the tunnel lighting
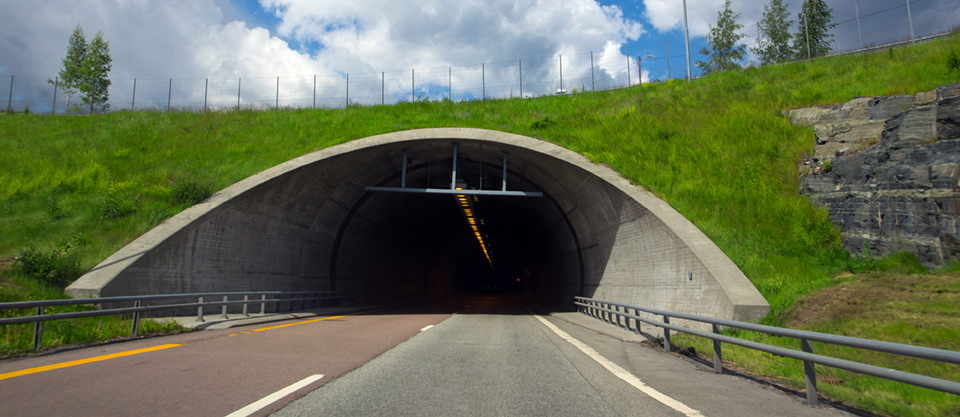
It goes without saying that safety is critical to tunnel lighting, but challenges remain for safe tunnel lighting. The black hole effect is the major threat to safe tunnel lighting. To figure out the reason for the black hole effect, let’s take a look at the environmental changes along the tunnel.
Imagine that you are a driver driving on the open road (during the daytime), and there is a tunnel ahead. The surrounding environment is bright due to the reflection of sunlight. And this makes you feel safe as you can recognize what’s going on around you. But the entrance of the tunnel appears like a black hole, as the entrance of the tunnel is much darker than the open road. The significant brightness contrast impedes your vision and endangers your fear and insecurity.
Thanks to visual adaptation, you can adapt to the dark tunnel. But visual adjustment is not instantaneous. It is dangerous to drive during this period. Visual adaptation must occur at least before you enter the tunnel. Otherwise, your vision is blurry. After a while, you adapt to the lower luminance inside the tunnel. Later, when you are ready to arrive at the exit of the tunnel, the lighting levels outside the tunnel are higher than the interior of the tunnel. Again, the brightness contrast may impede your vision.
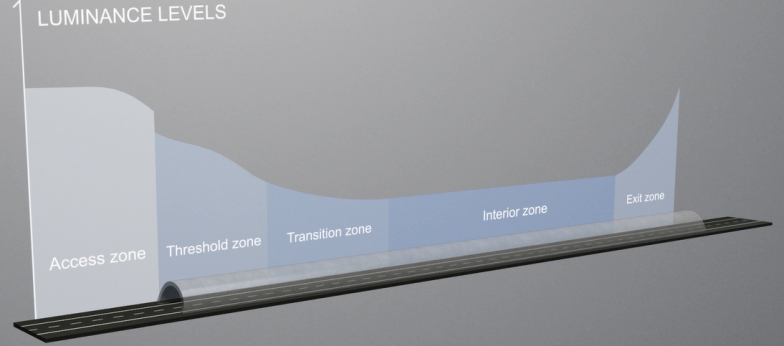
Therefore, tunnel lighting is zoned into 5 areas with different lighting level requirements to ensure visual adaptation. Lighting levels at the entrance should be brighter and then reduced slowly inside the tunnel. At the exit of the tunnel, the lighting level is increased.
5 zones of tunnel lighting
CIE claimed that the lighting requirement at a tunnel should be applied to the outside lighting level and the point in the tunnel where visual adaptation must have occurred. There are 5 zones of tunnel lighting. When planning the tunnel lighting, there are the basics for a safe and successful tunnel lighting system.
1. Access zone
The access zone is the stretch of area approaching the tunnel entrance. In this zone, drivers must be able to identify possible obstacles. Additionally, visual adaptation must have occurred in this zone. The L20 method is widely used to calculate the visual adaptation, which calculates the average luminance within a 20° viewing cone of the driver’s sight, starting from the access zone and centered on the entrance. The lighting level in the next zone of the tunnel is affected by the visual adaptation of the driver.
2. Threshold zone
The threshold zone is the entrance of the tunnel. It is the most important zone for safety, as black holes often occur in this zone. Thus, luminance must be constant and uniform in the first part of the threshold zone and then reduced slowly. The lighting level at the end of the threshold zone can be reduced to about 40% of the initial value.
3. Transition zone
The transition zone is the second part of the tunnel. The lighting level is decreased slowly in this zone to allow visual adaptation in the next zone. The reduction of lighting level must not exceed a 1:3 ratio, which means the lighting level at the beginning of the transition zone must not be higher than 3 times that at the end of this zone.
4. Interior zone
The interior zone is often the longest area of the tunnel. The lighting level in the interior zone depends on the speed and traffic flow. Here is a table about the recommended lighting levels for tunnels with different traffic and speeds.
|
Tunnels |
Recommended Light Levels |
|
Suburbs, low traffic, low speed (<70 km/h) |
1.5 - 3 cd/m2 |
|
Suburbs, high traffic, high speed (>70 km/h) |
2 - 6 cd/m2 |
|
Highway |
4 - 10 cd/m2 |
|
Urban |
4 - 10 cd/m2 |
5. Exit zone
The exit zone is the last part of the tunnel. The lighting level outside the tunnel is higher than in the exit zone. Although the human eye can adapt instantly from low to high lighting levels, the exit may be invisible due to the brightness contrast. Thus, the lighting level at the exit zone must be increased to allow drivers to adapt to the bright outside. The lighting level of the exit zone should be 5 times the level of the interior zone.
How to install tunnel lights
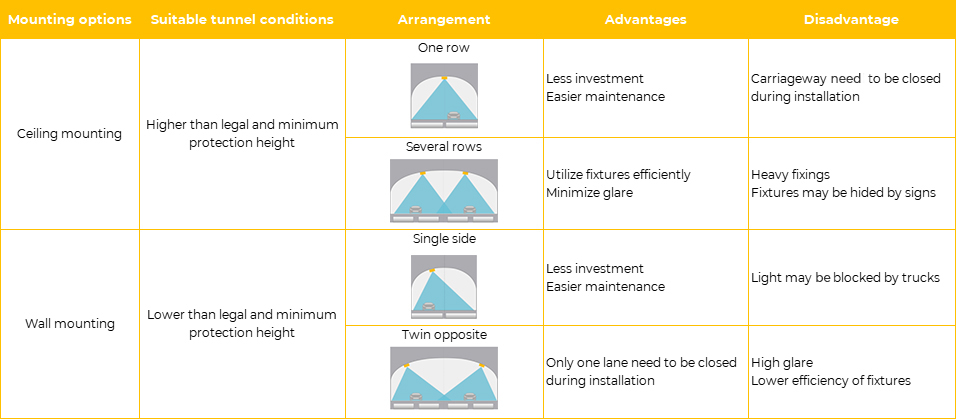
Ceiling mounting and wall mounting are the common options for installing tunnel lights. Improper installation may result in uneven lighting distribution and glare. We should keep in mind that each tunnel is unique. Therefore, the answer to how to install tunnel lights is varied. Knowing the effects of installation on lighting performance helps us select the right installation more effectively.
Generally speaking, ceiling mounting is suitable for tunnels that are higher than the legal and minimum protection height. While the wall mounting is the opposite. In a certain range of mounted heights, the lower the mounted height and the smaller the installation angle, the greater the road illumination and the more uniform the lighting.
Here is a table about the mounting options of tunnel lights and their respective effects.