Many people ask whether solar lights work in winter, on cloudy days, or in the rain. The short answer is yes, they do.
So why do so many solar lights fail during these conditions? The reasons are simple. Reduced sunlight means shorter charging time. Low temperatures reduce battery capacity. At the same time, longer nights increase runtime demand and overall energy consumption.
If you want solar lighting to perform reliably in winter and low-light conditions, you need to control the variables that matter. This blog covers 6 factors you can actually manage: panel selection, installation angle and positioning, battery choice, controller settings, energy management, and when to consider hybrid systems.
Choosing the Right Solar Panel
The solar lighting system starts with the panel. It is the only component that brings energy into the system. If the panel cannot collect enough energy, the battery will not charge, and the light will fail.
Monocrystalline solar panels
If the system needs to work through winter, monocrystalline is the baseline. They perform better under diffuse and indirect sunlight, which is typical on cloudy days. In real conditions, they can deliver 15% to 25% more output than polycrystalline panels under overcast skies. This difference matters in regions with limited winter irradiance.
Balancing panel size and wattage
A larger panel collects more energy, and higher wattage increases potential output. That part is obvious. The mistake is assuming bigger automatically solves the problem.
What matters is how much usable energy the panel can produce under actual site conditions, not peak rating under ideal sun. Efficiency, local irradiance, and daily sun hours determine real performance.
Integrated vs. separate panels
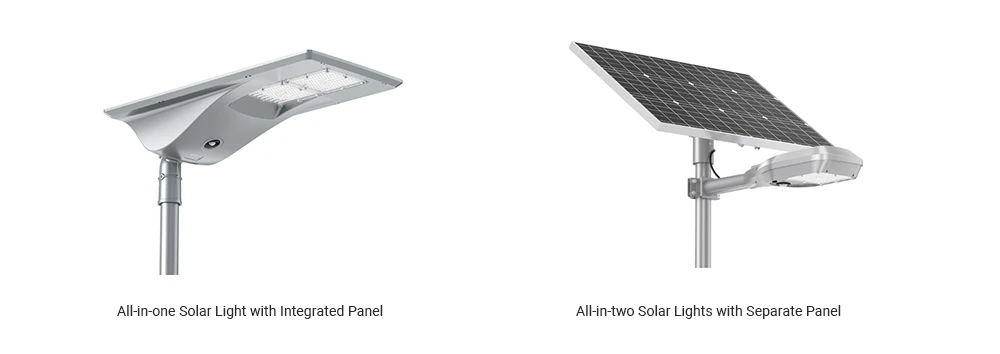
All-in-one solar lights are simple to install and keep the structure clean. The problem is the fixed panel angle. In many cases, the tilt is too shallow for winter sun, and snow or dust buildup is harder to manage.
In low irradiance regions, separate panels are often the better option. They allow proper orientation and tilt, which directly improves winter charging performance.
Panel Angle and Positioning
Installation determines how much energy the solar lighting system actually gets. In winter and cloudy conditions, available sunlight drops sharply, so you need to capture as much of it as possible.
Adjust the panel angle for maximum solar input
The sun sits lower in the sky during the winter months. A panel mounted flat on top of a fixture is effectively set for summer, when the sun is high. In winter, that same panel receives sunlight at a shallow angle, which reduces energy collection.
As a rule, set the panel close to the site latitude, then increase the tilt for winter conditions. For example, a system that works at 15° to 20° in summer may need 30° to 40° in winter to maintain output.
An adjustable mount allows you to align the panel toward the sun, improving daily energy harvest and stabilizing battery charging.
Our all-in-two solar lights, like ST57 Fino, have a 360° rotatable spigot and a ±40° tiltable bracket that allow the solar panel to align with the sun’s direction and maximize the energy storage. This matters in locations with seasonal sun angle changes or inconsistent weather.
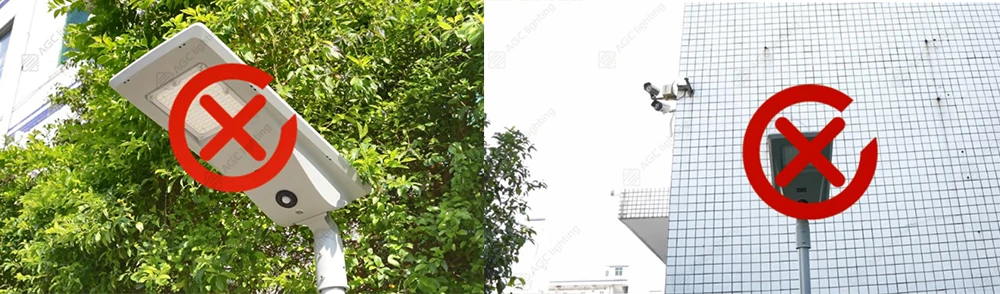
Position the panel to avoid shading
Shading is one of the most common causes of poor performance. Even thin shading can significantly reduce output.
Do not evaluate shading based on summer conditions. In winter, the sun is lower, and shadows are longer. Tree branches, poles, roof edges, and nearby structures that seem harmless in July can block a significant portion of sunlight in December.
Choose Batteries That Can Handle Temperature Extremes
Solar lights operate outdoors year-round. The battery has to handle both cold winters and high summer temperatures. If it cannot, the system will fail even if the panel and controller are sized correctly.
Cold temperatures reduce available capacity, increase internal resistance, and slow down charging. High temperatures accelerate chemical degradation, shorten cycle life, and increase the risk of swelling or leakage.
For solar lighting systems, the two common battery chemistries are ternary lithium (NMC) and lithium iron phosphate (LiFePO₄). In outdoor applications, LiFePO₄ is the more reliable choice.
|
Feature |
LiFePO₄ (Lithium Iron Phosphate) |
Ternary Lithium (NMC) |
|
Cathode Material |
Iron + Phosphate |
Nickel + Manganese + Cobalt |
|
Cycle Life |
2,000–4,000 cycles |
1000–1,200 cycles |
|
Heat Tolerance |
Stable up to 60°C |
Less stable above 45°C |
|
Risk of Thermal Runaway |
Very low |
Higher than LiFePO₄ |
|
Capacity Loss at –10°C |
~15–25% |
~30–40% |
|
Performance at –20°C |
Usable with reduced output |
Poor without heating |
|
Cold-Weather Charging Safety |
Stable, safer |
Higher risk of lithium plating |
From the table, we can know that LiFePO₄ holds up better in both hot and cold environments. That is why our products feature LiFePO4 batteries, providing more stable runtime, longer service life, and fewer field failures.
MPPT vs. PWM Controllers
The charge controller regulates how power flows from the panel to the battery. It determines how much of the available solar energy is actually captured and stored.
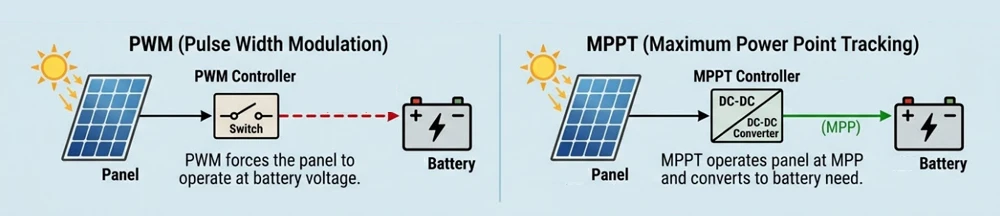
There are two common types: PWM (Pulse Width Modulation) and MPPT (Maximum Power Point Tracking).
PWM controllers are simple and low-cost. They connect the panel to the battery and reduce voltage to match the battery during charging.
MPPT controllers actively track the panel’s maximum power point. They continuously adjust voltage and current to extract the highest possible power under changing light conditions.
For installations in cloudy regions or winter conditions, MPPT is the practical choice. MPPT can increase usable energy harvest by 15% to 30% compared to PWM.
For a detailed comparison of how this works in practice, see our MPPT vs. PWM controller guide.
Smart and Adaptive Features
The controller does more than manage charging. It also controls how energy is used. With an MPPT controller, you can program operating schedules and set lighting profiles to match actual demand.
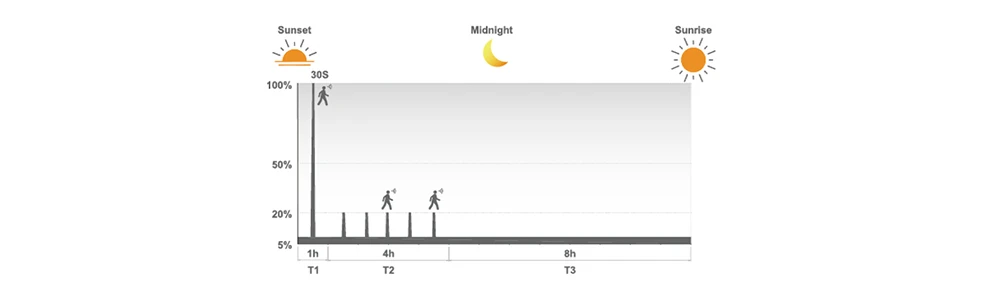
Dimming during low traffic hours reduces unnecessary power consumption. Full output can be reserved for peak periods when visibility and safety matter most.
Motion sensors take this further by adjusting output in real time. The light stays at a lower level when no activity is detected and increases to full output when motion is present.
In winter, when available charge is limited, this strategy reduces energy use without reducing perceived safety or coverage.
At AGC Lighting, selected solar lighting systems include built-in motion sensors and MPPT controllers. In intelligent mode, our solar lights can work for 3-4 days.
Hybrid Solutions
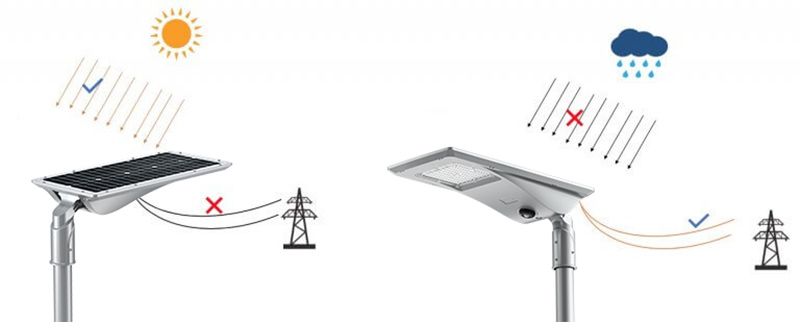
If a site receives fewer than three peak sun hours per day in winter, a pure solar lighting system will struggle, even if it is properly sized. This is common in Northern Europe and the Baltic region.
The same applies to critical applications such as highway interchanges, prison perimeters, and high-security rail yards. These sites require consistent lighting.
In these cases, a hybrid solar system is the practical solution.
At AGC Lighting, we understand the varying conditions and challenges faced by areas with limited sunshine. So we provide hybrid solar lighting solutions.
A hybrid solar lighting system combines solar power with grid backup. The system prioritizes solar energy when it is available. When battery levels drop below a set threshold, it automatically switches to grid power. This ensures continuous operation regardless of weather or seasonal changes in sunlight.
Need solar lighting that fits your project’s climate and application? Talk to our team. We will review site conditions, runtime requirements, and budget constraints, and give you a clear answer on what will actually perform.